Adding A User to a Group
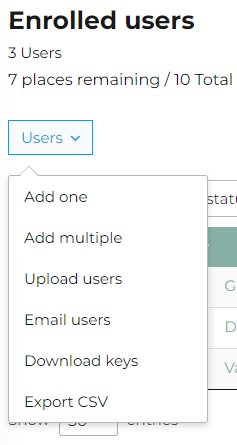
When you click the Users button, you can choose between adding one user or adding multiple users. It also offers other options we’ll come to later.
If you select Add one, a form appears with two options:
- Add and invite user: Enter the user’s first name, last name, and email address to add them to a group. Once you click the Add User button, an email is sent to them. The user is added to the group, a place in your group is used up and their status is set to Not Started. NB If you add a user that already exists on the site, the system will spot that, automatically add them to the group and send them an email. They then occupy a seat in the group just like a new user.
- Send enrollment key: Enter the user’s first name, last name, and email address to send them the Send enrollment key email. Once that user registers and redeems that key, they take up a seat in the group, are enrolled in the group and can begin group courses.

We do not recommend the send enrolment key option. This means the person has to register on the site, faff about with keys and it’s all a bit unwieldy. There are occasions where you might need to send a user a lost key, but Option 1 is a far easier onboarding process for the user – and you still need to fill in the same info anyway.
Option 1 sets up an account for them if they don’t have one, sends out emails to confirm their details / set a password and enrols them on the course.
Adding Multiple Users
Users can be added in bulk by clicking Users > Add multiple, or by clicking Users > Upload Users and uploading a CSV file.
The Users > Add multiple presents you with a form with options very similar to those for a single user.
Uploading a CSV is the fastest, simplest way to onboard many users at the same time.
When you select Upload users there is a link to a CSV template file in the dialogue box tht appears. It only has four columns: user_email, user_pass, first_name and last_name. You can leave the user_pass column empty and the system will generate a random password for new users while leaving the passwords of existing users unchanged.
With the CSV upload option you can also choose not to send an email to the list of users you’re uploading. You might want to do this if you plan to distribute enrollment keys to your users in some other way.


